
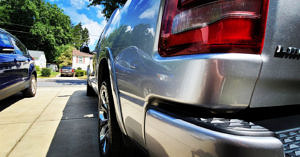
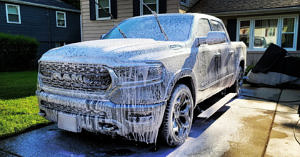
 So, not all of life can be vlogging and motorcycles [or can it? discuss!]. In this case, we took my 2019 RAM 1500 Limited to the beach for a week, where it sat parked 1 block from the ocean for a week. Sorry, I didn’t take any “before” pics, but as soon as we got home, I knew I needed to get her all shined up again – so here’s what I did – and what I used to clean ‘er up!
After all the interaction my Instagram and Facebook posts got, I thought I’d share my tools & methods for shining up my truck – and yes, this will work for any automobile [that I could think of, anyway!]
Tools / Materials:
Pressure Washer: 2000 PSI Ryobi Electric 1.2 GPM
Wash Mitt (2): Chemical Guys
Microfiber Cloths
Soap: Chemical Guys Sticky Snowball Foaming Wash
Foam Cannon: Chemical Guys
5-gallon bucket (any will do)
Grit Guard
Spray-On Wax: Griot’s Garage
Tire Shine: Meguiar’s Endurance Tire Gel
The above are Amazon Affiliate Links. Help support Road Reality at no extra cost to you when you purchase through them.
Steps:
 Prep
Prep
A good wash starts with good prep! First, add your grit guard to your bucket. This ensures that dirt coming off your wash mitts gets stuck at the bottom and without vigorous swishing, it’ll all stay there [you’ll even notice a film of dirt at the bottom of your bucket if you let it sit after your wash session]. Fill your 5-gallon bucket with a few ounces of the foaming wash, add about a gallon of water, and then drop in your wash mitts. This makes sure they get impregnated [yes, that word applies here] with the soap. Now add 2 more gallons of water. It’s handy if your bucket has markings on it, but you can generally eyeball it. Now, set up the pressure washer!
 Pre Rinse
Using the pressure washer, rinse the vehicle. This gets the bulky dirt off the vehicle and preps for the next step. Start at the top and work your way down, making sure to get as far under the vehicle as you can, to wash the undercarriage. Is that still a word? – Ed. Now’s a good time to make sure you’re familiarized with your pressure washer – is it high-powered, or light duty? It makes a difference. With a 2,000 PSI pressure washer, you can get fairly close to the paint without worrying about flaking it off – but anything higher and you want to be careful. As always, Road Reality, including its owners, contributors, or affiliates, are not liable for damage to yourself, your property, or anyone else’s property. Exercise caution when using power tools and chemicals.
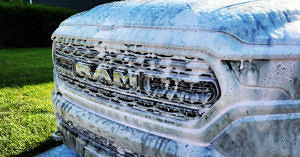
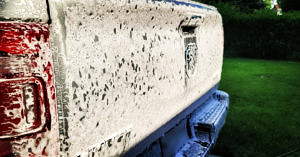
 Foam
Foam
With a now-wet vehicle, use the pressure washer to apply the Sticky Snowball Foaming Wash to the vehicle. I like to set the foam cannon to MAX SOAP and a decently-wide spray, but let your gut guide you on this one. Let it sit for 2-3 minutes, reapplying if needed. This is the really fun part – all the prep and rinsing leads to a suds-covered vehicle. Ok, maybe I’m alone in this… but I do find it satisfying to see. Make sure to get inside the fender wells and under the bumpers. This foaming wash really stuck to my truck – I can’t wait to try it on my motorcycles! This breaks up the dirt on the vehicle and adds lubricity to the paint, allowing the wash mitt to slide easier in the next step, which prevents swirl marks.
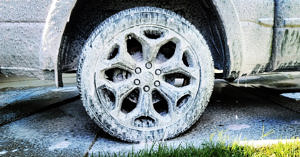 Scrub
Scrub
The difference between a good wash and a great one is making sure ALL the dirt is gone, including the most stubborn deposits! If you’ve ever used the spray wand at a DIY car wash, you know that just doing the spray gets a vehicle sort of clean, but it leaves behind a film of leftover dirt. Using the wash mitts, gently scrub the exterior of the vehicle. Use one wash mitt for the paint, glass, and plastic, and another one for exhaust tips, wheels, and tires. Brake dust and exhaust particles are particularly nasty, so don’t use the same mitt for the paint! A good wash mitt is like your best friend, so treat it well and don’t let it touch the ground. Every few panels, return to your wash bucket, dunk your mitt in the soapy water, and give it a few good squeezes to clean out the dirt and reimpregnate the mitt with fresh soap. This also helps prevent swirl marks.
 Post Rinse
Use the pressure washer to remove all soap from the vehicle. While rinsing, take note of stubborn dirt, and re-scrub any areas where dirt remains. Don’t be afraid to go over the vehicle a couple of times, to make sure you got all the soap off.
 Dry
Dry
Using a microfiber cloth, dry the vehicle’s paint, glass, and plastic. If one cloth gets dirty, use a fresh, clean one. It also means you missed a spot. Try better next time? Too mean. -Ed.
 Wax
Wax
After the first pass with the microfiber cloths to dry the vehicle, Spray the Griot’s Garage Spray-On Wax onto the paint and plastic trim and wipe with the same microfiber cloth. Wring out excess water & wax as necessary. Now, your vehicle should have a deep, glossy shine to it, and be free of water spots, streaks, and drips. Drive around the block, show off your ride, and when you get home, find all the water that came from hidden nooks & crannies, and dry it again with your microfiber. The spray-on wax I recommend lasts up to a month with normal usage, and I like to apply it after washes, but between major waxings every 6 months or so. [I can write that up too, if you’d like – let me know!]
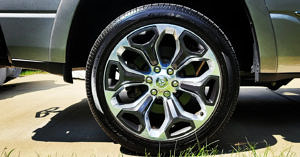 Tire Shine
This is the final step, and the one that makes your ride POP! Once the tires are dry, apply the Meguiar’s Tire Endurance Gel. This gel lasts up to a month with normal daily-driven usage of a vehicle, and looks great! Apply a second coat once the first dries, if your tires’ rubber is extra dry. [seriously, tires soak this stuff up!] This brings back that new-tire look, and adds a bit of gloss without being too much. Be careful not to over-apply, as it will sling up onto the vehicle’s fenders and sides. If that happens, use a fresh microfiber cloth to wipe it off the paint.
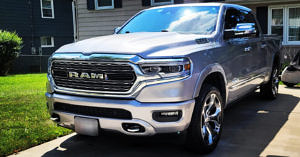
That’s all there is to it! It takes me 1.5-2 hours to follow this process. In the end, I think the truck looks STUNNING! What do you think?
-John