

As an update to yesterday’s post, and to answer some questions I’ve gotten about it, I uploaded a quick render of the video clip itself to YouTube, which you can see below. Below the video, I’ll map out how I did it and why it took so long.
Reminder: I’m using the free version of DaVinci Resolve 16, so if you’re using a different editor, expect things to be vastly different. Also, I’m a beginner, but there are some basic steps I’ll leave out – you should already know them before attempting this. Lastly, if you have a better/more efficient way of doing this, let me know!
I spent quite some time Googling how to do this, since I was sure someone else had – and I’m still sure someone else has done this – but they didn’t make a video for me to be able to follow their steps, so I did it using a LOT of trial and error. Luckily, there were some helpful videos on how to do somewhat similar things, so I used those as “jumping off points” to get to where this clip is. Hopefully this saves someone some time & energy in their own video editing!
 Step 1: Setup in the Edit Tab
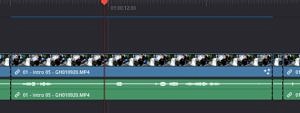
- In DaVinci Resolve, import your media files into your project, drop them into your Timeline, and then slice it to create an individual clip you want to overlay another video on top of.
- Place the Playhead over the clip.
- Step 2: Enter the Fusion Tab
- Go to the Fusion tab and ensure that this is the clip currently being modified.
- Step 3: Add a Merge Tool
- Select “MediaIn1” and press SHIFT+SPACEBAR to search for “merge” – and add a Merge tool.
 Step 4: Add a Tracker Tool
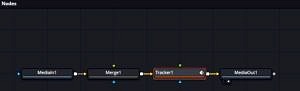
- Select “Merge1” and press SHIFT+SPACEBAR to search for “tracker” – and add a Tracker tool. Your Node window should now look like this:
-

Still of source footage, showing my placard. Step 5: Select Starting Frame
- Find somewhere in the middle of your clip where the desired tracking window (what you’ll be replacing with your overlay video) is clearly visible. I used a carboard placard with a piece of white paper taped to it, you can experiment with other ways to do this. (After I did this I learned about better markers like “X”s, and may try that in the future)
- It’s a good idea to remember this Frame Number, for reference later.
- Step 6: Add Trackers
- By default, Resolve gives you 1 Tracker.
- Click “Add” to add Trackers 2-4, and move them thusly:
- Tracker 1: Upper Left Corner
- Tracker 2: Upper Right Corner
- Tracker 3: Lower Left Corner
- Tracker 4: Lower Right Corner
- Step 7: Inspector Windows
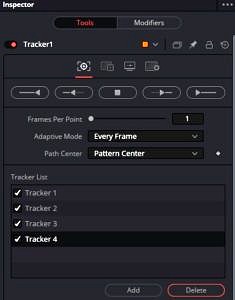 Set up your Inspector > Tools > Trackers screen to look like this:
-
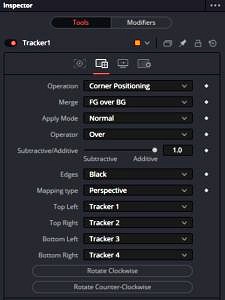 Set up your Inspector > Tools > Operation screen to look like this:
-
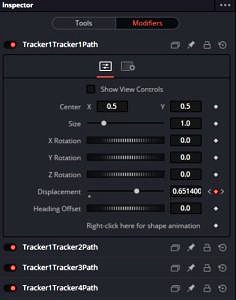 Set up your Inspector > Modifiers screen to look like this: (this is probably the most important step going forward! – Turning off the “Show View Controls” makes Step 11 MUCH MUCH easier)
- Step 8: Green Outline at Last!
- At this point, you should see the trackers and a green outline of your overlay window. If you don’t, then something isn’t set right. Go back and check your Inspector screens.
- Step 9: Track Forward
- Click the “Track Forward from Current Time” button and wait for it to render. (This button is the fourth of five from the left, visible in the first image attached to Step 7)
- Step 10: Track Reverse
- Go back to the frame you started from in Step 5, and click the “Track Reverse from Current Time” button, and again wait for it to render. (This button is the second of five from the left, visible in the first image attached to Step 7)
- Step 11: Hand-Adjust Individual Frames
- At this point, you’ve got the computer’s best guess as to where your placeholder (in my case, the placard) is located in each frame. You will most likely need to hand-adjust some of these.
- One of the things that held me up and took so long was realizing I needed to render the entire clip’s worth of tracking BEFORE I hand-adjusted any frames! I probably wasted 3-4 hours just doing this.
- Also, if you don’t render the entire clip and try to hand-adjust frames, it won’t save your changes.
- To accomplish the hand-adjusting, click on the little tiny box that controls the placement of the tracker. You should see up and right arrows highlighted when you click, and when you drag it around, the green outline box will follow it.
- If a red box appears, stop what you’re doing and press CTRL+Z to undo that change.
 Step 12: Attach Overlay Video
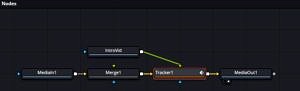
- Now that the tracking is done, you can link in your overlay video. (Your Node window should look like the one at right)
- Drag your overlay video from the Media Pool to your Node window and link it to the Tracker’s Foreground (green link).
- Now you can play with the settings on the new “MediaIn2” object (I have renamed mine to “IntroVid” to more easily keep track of the different media files) to get your desired piece of the overlay video, well, displayed in your overlay, inside the tracking window.
- Step 13: Review
- Review the footage in the Fusion tab, to ensure it is exactly the way you want. If you’re not working on powerful hardware, the playback will be choppy at best. You can still hand-adjust anything that’s not quite to your liking.
- Step 14: Render & Enjoy!
- Go back to the Edit tab, where if you have “Render Cache” in the Playback menu set to Auto, your clip will fully render for a final review. This may take some time, again on less-than-powerful hardware.
- Sit back & enjoy your finished product. Congratulations, you’ve done in (hopefully) an hour or less what it took me many hours to figure out!
This method will allow for all types of movement, as you’ll see in the video below. It’s a 20-second rendering of the intro to a video I’m still working on, but really wanted to try something neat on.
Again, I hope you enjoyed this tutorial-ish post if you got something out of it, let me know!
-John