

Dramatic much? Yes. Important? Also Yes.
My wife’s old laptop had a failed or failing hard drive in it, so she bought a new laptop. Two years later, I finally got around to trying to get the contents of her hard drive transferred to her new computer, and I was at mostly successful. How did I do it?
Some late-night Internet research yielded the first way to fix it – CHKDSK (Check Disk). Hey, I remember that from the old days of Windows 95!
Here’s how you can take a failing hard drive and recover most, if not all, of its contents for transfer to another computer. It’s assumed that your new computer at least recognizes your old hard drive, even if you can’t access the files on it – this is where Check Disk will help!
Step 1: Purchase an adapter kit like this one. (this is the one I used last night for this process)

Step 2: Get the failing hard drive extracted from your old laptop.
- Note: Each laptop is different, so your steps will differ. Refer to your laptop’s manufacturer, the Internet, or your local computer nerd for removal.

Step 3: Plug the old drive into your new laptop.
- Use the Adapter Kit you bought. This shouldn’t need to be said, but I wanted to be thorough in my explanation. Verbose is still a word in common usage, right?
Step 4: Use CHKDSK to make the drive readable again.
- Note: If this step does not work, your best bet may be a local Data Recovery Service. Again, check the Internet for reputable businesses near you who provide this service and consult with them. Be forewarned: Data Recovery may not be cheap – it can cost $200-1,000 for a relatively easy recovery.
- How to use Check Disk:
-
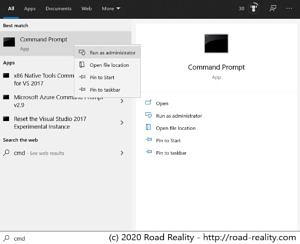
Launching the Command Prompt app as Administrator Step 1: Open an “Administrator” Command Prompt
- Click on the Windows Icon (left side of your task bar) or press your Windows key on your keyboard.
- Type “CMD” (minus the quotes, of course).
- When you see the “Command Prompt”, Right-click it and select “Run as Administrator”
-
-
-
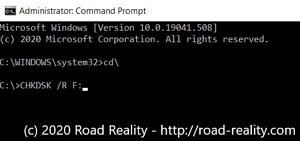
The command you need to run (example shows “F:” drive – yours may be different!) Step 2: Run Check Disk (CHKDSK)
- In the command prompt window, type “CHKDSK /R <drive letter>:” Replace “<drive letter>” with the drive you’d like to repair.
-
-
-
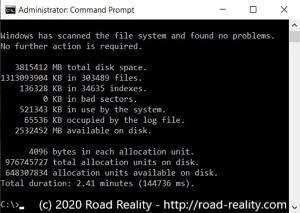
Results of CHKDSK running on a healthy drive Step 3: Let it run! This will probably take several hours, so kick it off overnight and see the results in the morning. Larger drives and ones with more errors will take longer to process.
- Check Disk should’ve fixed your disk errors at this point. In the case of my wife’s hard drive, it was a Master File Table (MFT) that had been corrupted, making the files unfindable by File Explorer.
-
Step 5: Success! (hopefully)
In our case, we were able to recover over 99% of the drive’s contents, and my wife is now happy to have her pictures, videos, and documents, safely ensconced on her new laptop. I’ll be getting her an external drive to store stuff in the future, which runs its own risks but makes portability easier.
-John