
 Shortly after purchasing my 2015 Ford F-150, I found out that a fair amount of owners were experiencing less than stellar performance of their front seat coolers. When the temperatures finally warmed up, I tried mine out, only to find I was one of the unfortunate ones. User SeatGuru on the F150Forum.com web site has come up with a fix, and I’ve installed it. Continue reading for the installation instructions, my review, and the results!
First, some background. The redesigned 2015+ F-150 seats have a thermoelectric device (TED) in the seat bottoms and seat backs of the front driver and passenger seats. When current is applied in one direction, the seat is heated. When the electric current is applied in the other direction, the seat cools. The seat bottom is open, which allows free intake and exhaust for the TED, whereas the seat back is of course closed, constricting air flow. Before the TSB was created, owners were experiencing extreme heat and scorched leather seats, in addition to the seat back simply not cooling.

User SeatGuru and another forum member worked with Ford’s seat engineers, and with his CAD skills and a 3D printer, came up with parts for the intake and exhaust of the TED. Ford’s engineers went their own way, creating a “sock” for the intake, but no solution for the exhaust.
SeatGuru, due to popular demand, began creating and selling intake and exhaust kits. The kit I ordered was a V2, which is a redesigned and reinforced version of the V1 exhaust-only kit. I had the TSB performed by my dealer, in which they install the aforementioned sock for the intake of the TED. This, as I was already fearing due to online research, was ineffectual in actually increasing the amount of cooling, leading to my ordering of the V2 exhaust kit.
In comparison to the V1 kit, the V2 exhaust is made of a more durable plastic and reinforcing metal plates.
Installation:
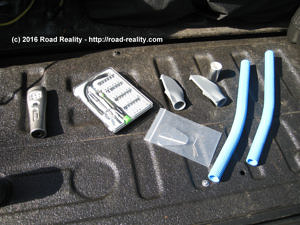 Before beginning the installation, you’ll need the following:
- V2 Exhaust Kit (order here)
- T6 and/or T7 Torx bits
- Flashlight
- Heat gun or hair dryer
- Phillips head screwdriver
- Pliers
- Scissors
Lay everything out and get familiar with it, because the interior of your truck may get cramped.
Step 1: Move the seat
 Move your seat all the way back and up, making room underneath. My truck is a SuperCrew, so I had plenty of room between it and the rear bench, but trust me, you’ll need the room underneath the seat for your hands to get in there. It’ll also help when using your flashlight to see what you’re grabbing on the seat bottom.
Step 2: Prep the parts
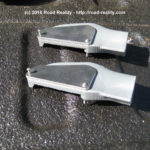 Install a metal plate on the flat side of the 3D printed part and insert the supplied screws.
Step 3: Open up the Seat
 Remove the bungee cords on the underside of the seat. They are wrapped around white clips, and on the left side of my driver’s seat, there was an electrical connector in the way. Wiggle it and pull to get it out – it’s stuck on there pretty well!
There’s no need to unplug any of the connectors.

Now, separate the “J” channels at the seat bottom. I found that trying to collapse the “J” worked to snap them out of place. There’s no great way to explain this, but it’s eventually come apart.
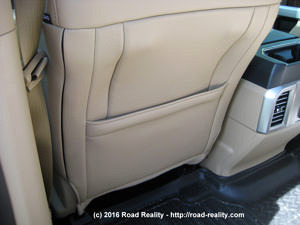
At this point, the seat back material is loose, but you’ll have to unzip the sides to expose the seat back.
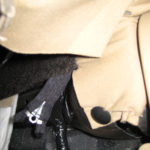 Using your pliers, carefully and slowly unzip each side. I used needle-nose pliers to grasp the zipper pull, and then pushed upward to unzip the zippers. Take your time – this is where the dealerships tend to ruin seats. My outboard zipper pull’s eyelet was broken, showing how easy it is to break these things.
Once you’ve got the zippers open, secure the seat back material up and out of the way. I used a bungee cord I keep in my truck to hold it up near the head rest.
Step 4: Install the V2 Exhaust
 First, remove the black plastic cover plate, which covers the TED. It’s zip-tied on in two places. I used scissors to break the zip ties.
- Next, remove the 2 torx bolts from the TED. Initial instructions say either T6 or T7 bits work, but for my seat, the T6 bit fit.
- Install the 3D printed part, with its metal plate, on the TED, using the supplied screws. I accidentally installed the tubing on the 3D printed part at first, and then tried to do the install, which did not work. It’s much easier to attach the 3D printed exhaust part onto the TED and then install the tubing.
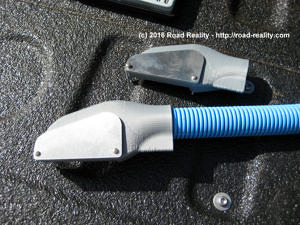
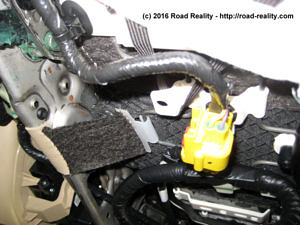
 Test fit and then use your heat gun or hair dryer to mold the blue tubing, routing it from the 3D part to the right (inboard on driver’s seat) and down to the seat bottom. I heated up the end of the tube and fit it into a slot in the metal. Be careful! The metal in these seats is SHARP!
- Once you’re happy with the placement and routing of the tubing, use the supplied tape to hold it in place. You can wrap it a few times, since there’s extra supplied in the kit.
Step 5: Close up the Seat
Work backwards, closing the zippers, the “J” channel, and reattaching the bungees and the connector you unsnapped from its base earlier.
Now you’re ready to test out the new seat cooling!
Review:
After installing the V2 Exhaust kit, and with 75F degree weather, I went for a drive. Immediately you’ll notice that the seat back doesn’t have a hot spot, and after 20+ minutes of running the seat cooling, it hadn’t stopped cooling. While it may not be as efficient or as cold as the seat bottom, it’s a lot better than it was, that’s for sure!
Overall packaging of the kit was excellent, the only thing I would’ve liked to see is printed instructions, but I understand SeatGuru is doing this as a favor to other F-150 owners, so I’ll give him a pass. If my own printer was working, it would’ve been easier, but as it was, I used the V1 instructional PDF to plow through this install.
by John Suit
Thanks to Tim (SeatGuru) for helping us F-150 owners! Click here to visit his web site and order the kit if you own a 2015+ Ford F-150 with Heated and Cooled front seats.