
One of the worst feelings as a creator of content is realizing you missed the shot. Whether it was bad lighting, a technical malfunction, or something else – you just didn’t get the result you wanted. Sometimes you realize it in the moment and can do a re-take or move and get the lighting right, but other times you don’t realize it until you’re editing a post or video – often times many days later!
I recently had the displeasure of realizing during the editing process (many days after the footage was taken) that my GoPro ate a video. DaVinci Resolve’s Media Pool said the file was online (available), but in the Editor Timeline, it was mostly showing the above image. Literally, the most important 30 seconds of a video was corrupted and could not be read. Uh oh!
I took to the Internet for solutions. Most of them require paying money, but I was after free, because I wasn’t sure how much (if any) of the video clip I’d actually use in the vlog. I finally found a couple of solutions, one of which failed and one of which worked.
The one that failed was to open up the video in VLC Media Player, which when you do a “Convert/Save”, is supposed to fix things. That didn’t do anything but take up more space on my hard disk, so let’s skip ahead to what did work.
The solution which worked, is what I’ll share below! It wasn’t perfect, because about 30 seconds of the video was just completely corrupted, but I got the beginning and end parts back, and DaVinci Resolve was able to work with it – so I count it as a success. Here’s what I did:
Step 1: Download & Install the Handbrake program
-
- Download Handbrake here: https://handbrake.fr/
- Run the Install program you just downloaded
Step 2: Run Handbrake & Convert your file
-
-
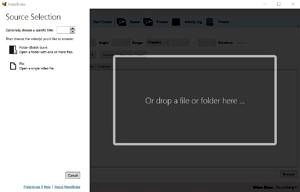
Handbrake’s Opening Screen Open Handbrake – you should see this screen
- Import your corrupted video file (drag & drop)
-
-
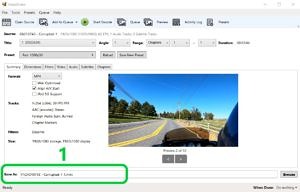 Select your “Save As” location (1)
-
-
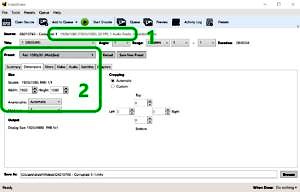
Dimensions Settings in Handbrake Select your Dimensions Settings
- Pay close attention to your Source (1)
- Check Video Dimensions (2) and Framerate to ensure you don’t lose resolution or frames.
-
-
-
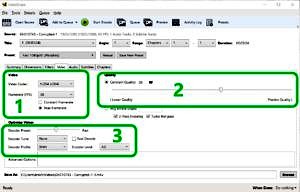
Video Settings in Handbrake Select your Video Settings.
- Select the proper codec that will work with your Editing Software (1)
- Set your Quality (2) (I recommend Placebo, or all the way to the right – “lossless”)
- Set Optimization (3) (I recommend Placebo, or all the way to the right – again, “lossless”)
-
-
 Click “Start Encode”
- Wait. This process can take hours, depending upon your computer’s hardware. For my 3m04s video, it took between 30 and 45 minutes (I walked away and let it run).
Step 3: Pull it back into your Editing Software & See how well Handbrake did
-
- In my case, I got a usable file. Even though the 30 seconds were still missing, it was no longer corrupted, and DaVinci Resolve was able to use the file and allow me to edit it.

I hope this helps someone else who has had a corrupted video file – it certainly helped me!
-John