
UPDATE 12/15/2020: Many asked, and I answered the question: What are the pain points of doing the install yourself? Click on the link, or scroll down for the in-depth video!
If you own a Harley, you have access to the downright huge Parts & Accessories (P&A) catalog to order farkles out of. In my case, I wanted more storage for carrying more and larger STUFF when I ride. Let’s face it: my Street Glide sometimes takes the roll of pack mule.
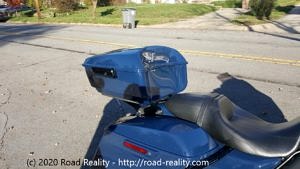
With that in mind, I ordered the “King Pak” tour pack for my 2019 Street Glide Special. Along with it, I ordered the wall organizer, two-up mounting rack, gloss black hardware, matching lock set, and antenna relocation kit – basically all the trimmings. I’m sure there are badges and stuff (read: baubles) that I didn’t order, but the necessities for mounting this thing on my FLHXS are covered. And just for giggles, I got the saddlebag liners too. Yes, I know they’re not technically related to the tour pack, but they’ll keep my coffee mug and other stuff from rattling around while I’m riding.
Ride along with me in the video below as I pick up the Tour Pak and get it on the bike … then continue reading, because I’m sure there’s something I missed while recording that I thought about later while writing this.
The mounting rack and lock kit are the only items I needed to install the tour pak, but the gloss black hardware is a better match to my bike’s factory look, since it’s already blacked out. The antenna relocation kit will keep my antenna from whipping up and hitting the back of the pack. Side note: the matching lock kit is nice because it uses the same barrel key that came with my bike.
The ordering process was easy, if a bit cumbersome. There’s no clear “If you buy a tour pack, you’ll need the following” type list on Harley’s web site, but the dealership, naturally, was quite helpful in adding things to my order that I’d need for the install. Also, you can’t order tour packs painted in any color but black through Harley’s web site, hence the dealer visit and subsequent phone call to complete my order. I chose to install the tour pack myself, since it’s supposed to be easy.
Unboxing everything, it was all packaged quite nicely. The dealership opened all the shipping boxes to ensure that all parts were accounted for and painted parts were pristine before calling me. This is a nice touch, and they re-packed everything and taped the boxes shut again so I didn’t have to worry about the parts being damaged on the trip home.
Each kit came with instructions, so I didn’t have to print them out myself. They’re thorough and include things like torque specs and drawings of the parts, which made the install rather easy. Basic hand tools (and a T20 torx bit) are all that’s needed to do the install.
 Swapping the chrome hinges to black replacements was straightforward, if a bit fiddly… as expected. They really accent the tour pack nicely and complement the stock black features of my bike. The mounting rack was super simple to install – just 4 nut and washer combos, and it’s together. The pack has studs coming out of the bottom of it which go into slots in the mounting rack, so you can adjust it fore and aft. The fore/aft adjustment can be used to adjust for bigger or smaller passengers, if you also get a passenger backrest. The wall organizer was not quite as straightforward, given the sculpted sides of the pack, but test fits ensured the included hook & loop fasteners would adhere, and they went in easily.
 Then came actually putting it on the bike. Not as quick or easy as I hoped, but a little fiddling got it on there – and it’s locked in place. Time to ride! (see the video above)
That’s all folks. It’s awesome, I love having the Tour Pack on the bike, and it’s both useful and nice-looking, even if it’s like adding a wart to a stunning cruiser like my Glide. It’s also expensive, but comes with factory support and fit & finish, so there’s that.
UPDATE: 12/15/2020: Here’s the in-depth Installation video!
-John