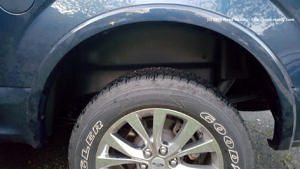
 Something I noticed on my 2011 F-150, as well as the current one, is the unfinished look of the rear wheel wells. You can see half-painted metal, as well as shocks and the underside of the bed… all things I think ought to be covered, especially on a truck whose MSRP was close to $60,000. Recently, I saw a deal online, so I snagged a set of Husky’s Wheel Well Liners. Continue reading to see how to install them, what issues I had, and how the truck looks after the install.
My last truck didn’t have wheel well liners, and while it was an aesthetic misstep by Ford to not include them (I checked, and GMC doesn’t include them as standard on their Sierra pickup truck), I never noticed from behind the wheel. Not so on the new truck, with its aluminum bed. Driving last winter in salt, snow and ice, it sounded like a heavy rain was falling on a tin roof. So I’ve been patiently waiting on a sale for the Ford or Husky liners, and recently the Husky ones went on sale.
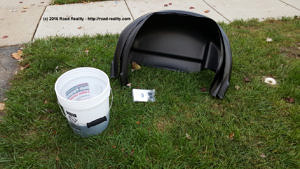
They showed up nicely packaged, along with the hardware to install them and printed instructions. Overall, the install wasn’t too difficult, although I had some fitment issues on the passenger-side liner (more on that later).
Step 1: Clean and prep
 The first thing you should do is remove grit and grime from the wheel well. I’m sure some water and material will get back there, but why not get the dirt out that you can, while you still have easy access?
Next, install two of the supplied clips on each side, as shown. The clips have a flat side and a protruding side – install them so the flat side faces you. Simply push the clips up and they’ll snap into place.
Step 2: Line up the liners
 Squeeze the sides of the liner a little bit, bowing the center out, and slide into the wheel well, like in the picture. Depending on the ambient temperature, this may be more or less difficult. If it’s cold out or the plastic doesn’t want to bend, use a hair dryer to soften it up.
Step 3: Install the liners
 This is where I diverged from the printed instructions, due to fitment issues of the passenger-side liner. The instructions want you to start by pushing or snapping the liner into the wheel well arches, and then install the 4 required screws, which go into pre-drilled holes in the liner and truck bed. This worked OK for the driver’s side, but on the passenger side, once the liner was in the wheel arch, the two middle holes didn’t line up at all. It could’ve been a mistake on Husky’s part, or the holes were drilled wrong at Ford. I’ll never know, but taking the liner back out and starting the two middle screws before pushing the liner into the wheel arch solved that problem.
The ends of each liner will take some, uh, convincing to get them into the fender flares and lined up with the existing holes, but once in, these things won’t be going anywhere.
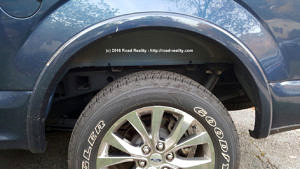
With the liner in place and all 4 screws started, finish tightening them down. Make sure the liner’s edge is in the wheel arch from front to back, stand back, and enjoy how much nicer the back of the truck looks.
A note about the 4 screws used to install each liner: make sure you have a short-handled screwdriver, as it’s a tight fit between the tire and liner. If you’ve got the space and equipment, you can take the rear wheels off to do the install, but it’s not necessary, as I have proven. I used a bit-in-a-socket-on-an-extension to tighten the front and back screws on each liner.
Review:
So this review may be a little premature, but here’s my initial impressions (if you pay attention to my Owner’s log posts, you’ll probably see a blurb in the next one or two about how they hold up over the winter):
Fit and finish is OK. The driver’s side liner fits better than the passenger side one, and was easier to install. The passenger-side liner doesn’t quite fit in the wheel arch, so we’ll see if anything collects in there. I’ll give it a good rinse after salt or mud and see what comes out. I’m not worried about rust (yay, aluminum!), but salt can still corrode.
Installation was OK, but the fitment issues on the right side gave me, ahem, fits.
As for sound deadening, which is one of the main factors I installed these, time will tell.
-John